Testing the Constant Velocity Model in high school physics: The “Buggy Lab”
Toy car collision lesson as a practical to complete the constant velocity model unit.
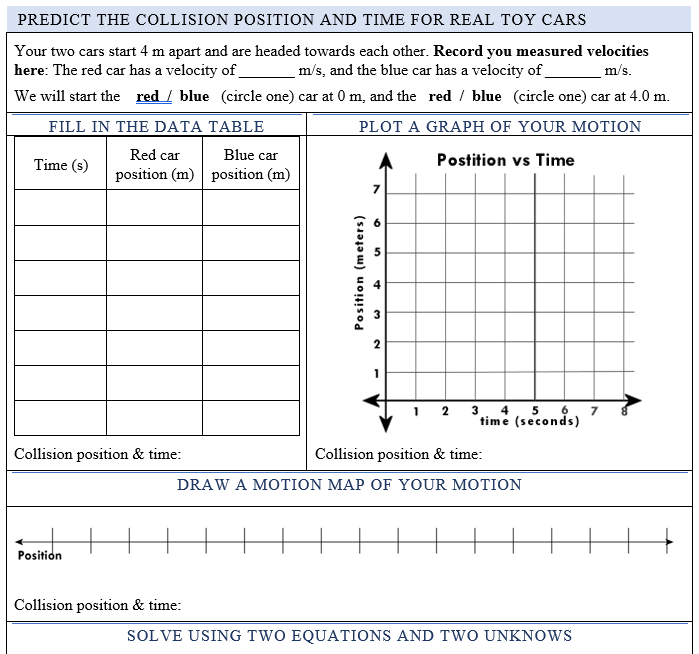
For several years I have used a car collision challenge as a summative/lab practical for my constant velocity model in physics. Students are challenged to determine where to toy cars (often called ‘buggies’ since the most common car used are red and blue buggies) will collide if started four meters apart. The basic strategy is:
- Each of two groups measures the time for a cat to go a specific distance, then calculates the speed of their car.
- Groups share their car’s speed with their partner group.
- Both groups calculate the collision point for the cars.
- They lay down a sheet of paper with their target location on it next to a tape measure.
- Students start their cars at the appropriate ends, and watch as they collide (hopefully at their marked location!)
Over the years, I have developed tips and tricks to make the lesson more engaging for students, as well as building in scaffolds for those who are challenged by the project.
2019: As finished as any teaching product ever gets.
Here is a slow-motion video showing improvements in my ‘grading target’
At first I had a “target” with a smaller “A” range, but not enough students reached that level (the cars curve often, which is beyond students’ control), so I rotated the target to landscape mode, and enlarged the A zone.
Scaffolding
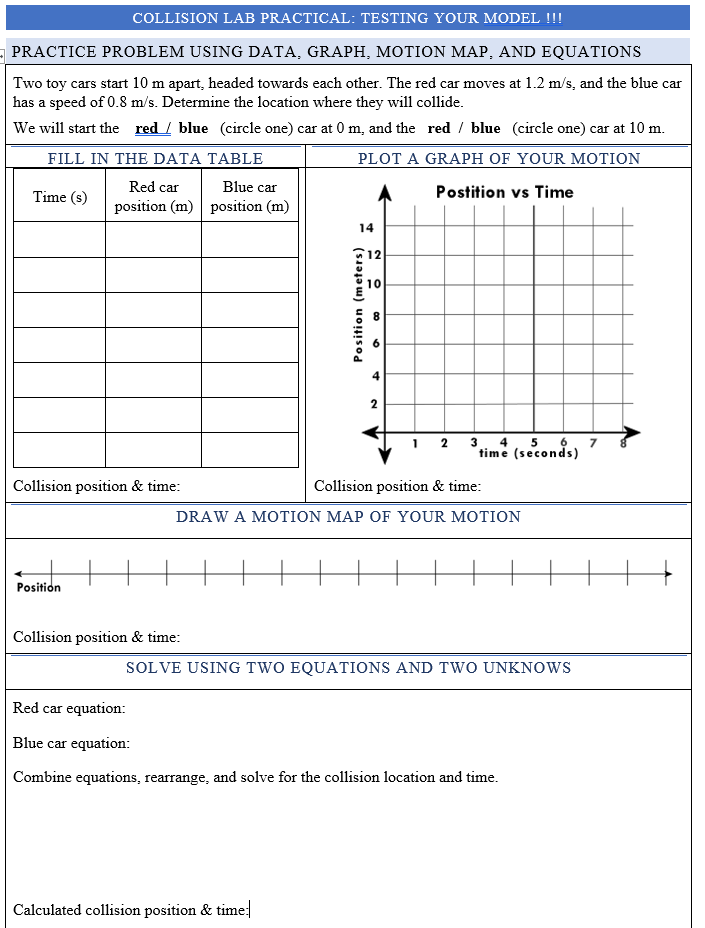
I teach both honors and college-prep physics, and many students need some scaffolding to be successful, and also to understand how they can use several processes to solve the problem. Now, before students complete their real test, they work their way through ‘canned’ data. This allows me to see where they are strong, and where they may need more work.
Students solve for the collision time and location using four methods they have used for solving similar constant velocity problems:
- Looking at a table of data and finding the intersection of time and position.
- Graphing the two cars and looking for the collision point.
- Drawing a motion map.
- Using “two equations and two unknowns.”
The final test
By now, students have had plenty of practice, and they are ready to test out a real prediction. On the back side of the practice page is a similar document, but with spaces for them to add their calculated speeds and starting positions:
Conclusions and resources
I have found students much more capable of success with this new layer of scaffolding, and it provides me with the ability to ensure that all students work through the practice without just jumping to the ‘fun’ test.
Resources I have for you:
Buggies: Arbor Scientific, Sci-Supply, Carolina Biological (expensive), Wards (expensive), PASCO, or many other science supply houses.
Enjoy and please share any thoughts or experiences in the comments section below.


This is so great, thanks for sharing! I wish I was as talented as you to make this website!